On pandemic plants
First off, it’s been a long while. Life picks up and changes speed in different ways, habits evolve, platforms fall out of use, and suddenly you realize you’re not at all where you last were when you were writing blog posts on WordPress. It feels like this platform belongs to a different time, not formatted for narrow-screen scrolling but rather for whole-page browsing. I like it.
We’re entering year 2 of the pandemic (the first pandemic? will I need to specify that for future readers, for my future self stumbling upon this in 5 years?) and like so many others, the first year was full of novelty. I upped my sourdough game, made gallons of kombucha, and, now a homeowner with a little dirt-and-mud plot of backyard, got really, really into plants.

None of this is profound, or particularly special. But I never turn down an opportunity for thoughtful reflection when it so clearly presents itself, and my journey from “try to keep this hardware-store pothos alive” to “reclaiming rainwater for my 80+ tropical houseplants” has been full of moments worthy of pause. (I have to add — I know 80 houseplants sounds like a lot but it’s amazing how it’s really not that excessive. This could be just the beginning. That alone is a bit frightening…)
The thing I want to think about is how much grace we give plants, grace that we don’t offer to ourselves.
When I get a new plant, it’s often in the form of a cutting. A few mature leaves and maybe a new bud, a node with an emergent root or the hope thereof, sitting in a wet paper towel. This cutting used to be part of a thriving plant, a mere appendage among the many of a rich, lush organism, and now here it is, severed and limp on my kitchen table. This cutting has suddenly transformed from wispy auxiliary tendril to “mother plant,” and has the power to put out roots, to grow into its own lush and thriving being, but for now is just barely holding onto life, sustained by a glass of water and some sun.
Given time, the cutting will grow those roots, and I will move it to some substrate — soil, nutrients, a vessel to hold it. Out of the water, it will need tending. Water at the right times, not too much. Some light, but of the right intensity, the right duration. Fertilizer sometimes, but never in winter. There are rules, superstitions, rituals for tending these silent beings we’ve brought inside our walls, and we observe to see if we’re getting it right. A trace of yellow — did I water too much? A shrivelled leaf — is the air too dry? A brown spot — are there pests? Is the light too bright? And each plant responds a tiny bit differently. Two cuttings, cut the same day, rooted at the same time, planted in the same pot; one thrives, the other wilts. Who can say why?
And we talk about shock. When you bring a new plant home, expect it to struggle at first. Even if you’ve given it a perfectly-planned home, it’s a new space and your plant may drop a few leaves in protest. Move it to a new, better pot and it may object to its roots being disrupted. Even if the old pot was causing problems, the plant still clings to the way things were and mourns its old home before thriving in its new one. And sometimes you need to move the plant around a bit, searching for the right spot. Warm enough, bright enough. I swear some of my plants have befriended each other and only really thrive when in the other’s company.
I have one plant that has lived in my house for 5 months and has not grown a single new leaf. It sits, resolutely, in its spot, and waits, perhaps for spring to come, with its warm sunshine. And yet the two cuttings I took from that plant, grown from some damaged leaves I pruned on its arrival, have put out new roots, and shoots, and leaves galore. The parent plant is biding its time. Maybe it needs something I haven’t been able to give it yet. But these cuttings were ready to create a new life.
When a plant fails to thrive, we don’t blame the plant. We try to understand it, and what circumstances are affecting it. We move it around the room, looking for the perfect spot that will make it happy. We buy clip-on lights and different soils, we melt down buckets of snow to give it fresh water. We give it time, quelling our impatience and desire for instant results. And we try to give it every opportunity to reach its full potential. And if it doesn’t — if it never flowers, or can’t stop dropping leaves, or shrivels under our care — we don’t get frustrated at the plant for not trying harder. That’s not to say we don’t get frustrated, and maybe we even blame the plant, or let it die. But underneath that superficial annoyance, we don’t attribute the cause of failure to the plant just not pulling itself up by its bootstraps properly. We recognize that some plants need more than we can give it, or different conditions than we have, and we embrace that.
I wonder what it would be like to truly extend that same grace, compassion, and care to people. To ourselves. Are we really in the right pot for us? Do we need some time to get over the shock of some change? Have we dropped a few leaves lately, and is there some small, incremental shift that would help us feel less shrivelled, give us more of what we need more of, or less of what there is too much of?
I think about how long it took me to feel “settled” in Montreal. How many moves, how many apartments. How disruptive each one was, even if it was an overall improvement. How sometimes change is necessary — in work, in friends, in relationships, in living space, in hobbies, in habits, in everything — to try to get closer to an environment, a life, that facilitates thriving. And maybe there isn’t one perfect windowsill for us to sit in our whole lives, maybe we outgrow one pot, then the next, or need more light or warmth some seasons of our life than others.
All I know is that I am far more patient with my houseplants than with myself, and maybe that’s something worth changing.
Girl clothes
I’m the mother of a little boy with an active imagination. He will happily tell me stories for hours, with incredible patience and enthusiasm, about the planet of the robots, where the fairies go to do war against villains and use their ice powers to freeze giant insects with multicolored eyes. I’m embarrassed to say that his stories are so long, so intricate, so enthusiastic, so effusive, that I can’t keep track. Often, my brain is so tired from a day of work or is wrapped up in some adult banality (or childish banality. Human banality) that I don’t even try to listen to the story. I put on my smilingest eyes and respond as authentically as I can, but it’s really a stream of, “uh huh! No way! Really?” which feigns engagement instead of actually jumping in.
My little boy has an alter ego that he values much more highly than his own natural-born self. His alter ego is 2 years older, goes to school (never daycare), and is the big sister of his primary ego. Her name is Anna, and she’s a fairy with ice powers (thanks, Frozen), and she has a sister Elsa, another sister Tinkerbell, a little brother Jean-Luc, and another little brother, Isaac (coincidentally the name of a close daycare friend). Because she is a girl, and a girl fairy no less, she has no interest in wearing “boy clothes.” Only “girl clothes.”
And as Mom, I have to figure out how I feel about this, and what I do about this.
At first, I was really happy to have a little boy who liked to twirl around in a skirt. He had a book where the central character, a little girl about his age, put on her prettiest dress for her birthday, and took such pleasure twirling around in it. I thought to myself, true! One of life’s great pleasures is twirling around in a full skirt. Why deny my little boy that pleasure, when he’s quite literally asking for it? I’d already bought him a kilt (dutiful bagpiper as I am), but the kilt didn’t twirl. So for his 3rd birthday, I bought him a big pink tulle tutu. It was a quick favorite, especially paired with his butterfly wings that Santa had brought, because butterflies had been all the rage in our house for the prior months.
That was when his first female alter-ego emerged, Zoë. Zoë wasn’t a well-defined character, just that she was a girl and liked dresses. She loved going to female friends’ houses and putting on their princess and fairy dresses most of all.
But recently my son has been doggedly interested in what it means to be a boy, and what it means to be a girl. It’s not surprising, when there are such strong distinctions, and when so many kinds of play are seemingly restricted by gender codes. My boy likes pink and purple, but finding pink clothes means shopping in the girls’ section by default. He likes flowers and hearts and stars and unicorns and fairies. He’s fascinated by magic, and wants to have magical powers. You know what? I just realized that magical powers are largely coded as feminine. Witches get magical powers. Fairies get magical powers. Witches and fairies are girls, by default. They have the ability to change reality, to make things happen, to control their surroundings, to build talking creatures out of snow, to frolic through the sky on a flying unicorn, to make flowers grow.
You know what boys get? Superpowers. Fighting powers. Strength. Danger. Sometimes (and only sometimes) these powers can be creative and productive. But they are largely destructive and adversarial. Light sabers. Flying machines with guns mounted on them. Laser beams. And my son likes these too! He’s fascinated by war (thanks, Star Wars), and imagines robot armies and cannonballs and poison forests. (I saw my family struggle with this during the holidays. This year J-L received a plethora of superhero capes and costumes, presumably the “boy” version of fairy wings and skirts that they’ve been seeing in the photos I post online.)
At this point in his young life, there’s something about being a girl that is more appealing than being a boy. Girls can play fairies with magic powers. Girls can wear twirly skirts and pink leggings and shirts with flowers and shiny stars on them. Girls can be mamas and have babies. These are things that he feels are forbidden him as a boy, and that he can embrace as a girl. I’ve tried to explain that, with the exception of the last one, which biology gets in the way of, boys can do all of those things too. Pink is just a color, not a “girl color.” There can be boy fairies! Leggings are cool for everyone, but really not warm enough in the winter, for girls and boys alike! But he doesn’t buy it, and I don’t blame him. He’s no dummy, and his whole job right now is to figure out social norms. Just because mom says pink is just a color doesn’t change the fact that no other boys or men that we see anywhere wear pink, or leggings, or twirly skirts.
And at this point in his life, he’s valuing these “girl” things as highly or higher than “boy” things. There’s admiration there, which I’m trying to prevent from turning into envy, by making sure that he has access to all these things and doesn’t feel excluded from the simple pleasures in life that he thinks would make him happy. I want him to keep thinking, his whole life, that being a girl is awesome, even if I also want him to grow into an acceptance of being a boy, and how awesome that is too. I want him to respect womanhood for what it is, as he grows in appreciation for the fact that it’s more than magical ice powers and ruffles, and to keep his love of things which are socially coded as “feminine.” I want him to be part of a generation that doesn’t say shitty things like “you run like a girl” as an insult, that doesn’t equate femininity with infantilism or weakness or pity. I want him to keep thinking that “girl” things are valuable, even if I eventually want him to really challenge the notion that they’re intrinsically “girly.” And while he challenges that, I want him to realize the subtle (and not-so subtle) differences in the ways boy things and girl things are coded and are treated as distinct — for better, for worse, for in-between.
Clothing and appearance just keeps hitting me hard these days. The way that girls’ clothes are cut to cling to the body, are flimsy, make it harder to climb and play, tear holes quickly. Seeing skinny, cold legs in leggings and tights instead of the awesome flannel-lined jeans and khakis I bought. They way nail polish makes your hands less useful for rough-and-tumble play, starting from the 10 minutes you’re incapacitated sitting still while it dries, through every time you think about what your nails are touching so as not to chip the polish off. How sparkly headbands slip off your head while you’re running, making you stop and fix your hair every few minutes, until you find it’s maybe too cumbersome to run today. They way girls’ shoes have slippery soles that are lovely for pirouettes, but less useful for sprinting, or climbing. The way parents say, “careful, you’ll get your nice dress dirty!” and are concerned that running it through the wash will take all the sequins off. A real concern! But boys don’t have to deal with that. At the same time, they don’t get the pleasure of a sequined dress and shoes that let you pirouette. Am I wrong to try to give my son both, and navigate the in-between?
Ah, conflict. Of course. Being a conscientious parent involves always questioning your parenting choices, from day one. Am I confusing him? Am I encouraging something that will cause him problems down the line? Is some intolerant asshole going to punch my sweet baby in the face someday and call him a fucking faggot, all because his mother humored his childhood imaginative play and bought him a couple of skirts on sale at Old Navy? Is there something I should be doing differently? Is this a subtle form of acting out against family dynamics that are sometimes strained, despite our consistent best efforts to be solid and happy and secure? Worry, mama, worry.
I think we’re doing okay. I know we’re doing okay. One day at a time.
Glossolalia
A wordy, personal meditation on language, communication, music, and a circuitous path home.
Cold noses
It must be getting cold out there in North America…because the top search term that leads people to my blog is “Free knitted nose warmer pattern”.
There must be some cold noses out there! Keep warm!
(for all of you who have wondered where I disappeared to, I’m still here! And I’ve got a bigger post coming up – with a link to a lovely pair of scarves that can certainly keep those noses toasty…)
eduroam – wifi on the fly (Harvard edition)
Strange internet in a strange city.
This post is completely off my normal topics, but I’m putting it up here anyway in the hopes that it will help wandering scholars get their internet fix!
Some hefty disclaimers: I’m not a tech expert by any accounts, so some terminology may be used inaccurately in what follows. I’m not writing in any official capacity, only from the experience of an end-user using Mac and Apple products with the Harvard network. All files and links I’m including are up-to-date as of May 1, 2014, but I do not intend to maintain/update this page, so use these at your own discretion, and contact your school’s IT help desk directly for additional assistance.
Let me set the scene: A Harvard graduate student is spending time away from campus, in a city where there are plenty of other academic institutions, but she doesn’t have any affiliation with these institutions. For reasons of both work and leisure, she needs to connect to a wireless network. Where to find wifi? Starbucks? McDonalds? What about all these colleges and universities? Wouldn’t it be great if there were some kind of internet consortium that allowed traveling scholars to use the wifi networks on other campuses?
OH WAIT THERE IS.
It’s called eduroam. It’s available all over the world. It’s an awesome thing. Lots of times, wandering downtown various cities or on college campuses I’d catch an eduroam wifi signal. But how to connect?
First, your home institution needs to be an eduroam member. If you’re in the US, you can check here to see if your school participates. I saw that Harvard was a member, so I knew I was supposed to have access. But what next?
Unfortunately, there’s not a lot of information out there on how Harvard students, faculty, and staff can use Eduroam. At the time of writing, Harvard’s FAS IT site doesn’t even turn up any results for “eduroam” when you search their site. A Google search led me to a registration portal, which was not particularly explanatory and seemed more targeted toward newcomers to Harvard’s campus. I wrote to Harvard’s help desk, asking them to provide better documentation, and received these instructions (which did help), but I’m writing this page to help clear up the whole process for Harvard affiliates like me who might never have encountered the term 802.1x authentication before. If you’re an affiliate with an eduroam partner that isn’t Harvard, you can read through the basics below, but the certificates and login information will be different, and you ought to check with your home institution for the particulars. With that said, are you ready? Let’s begin!
Step one: Get internet access.
This seems like a redundant, self-obvious point, but one of my biggest frustrations with setting up eduroam was you absolutely need to set it up while you have internet access, in order to configure your computer or device. But of course, if you’re trying to connect to eduroam, it’s because you don’t have internet access in the first place. Catch-22? Yes. But if you’re reading this, you’re on the internet, so now’s the time to configure everything. And really, get everything done while you’re online right now. Laptop, phone, iPod, iPad, everything. You’ll thank me later.
Step two: Install configurations.
Harvard has an installation page with different OS options here: Harvard Wireless: Secure or Eduroam. Choose your operating system, follow the prompts for the installation wizard, and install the configuration profile.
Note for mobile (iOS, Android) users: I had lots of trouble getting to this page on my mobile devices, because I was redirected to a different mobile site. One thing that could work is using a mobile browser like Chrome which allows you to request the desktop version of the site. What I ended up doing in the end, though, was downloading the mobile configuration to my laptop, and emailing it to myself as an attachment. Then, on my devices, I opened the attachment which triggered the installer for the eduroam configurations. For reference, the file I downloaded (on 5/1/14) was named mac_3515.mobileconfig, for iOS.
Step three: Account name and password.
While you’re doing your initial configuration, your device will ask you for your username and password. Easy, right? Wrong. What you need to enter is unlike any other login at Harvard:
Account name: [8-digit HUID]@harvard.edu
Password: your HUID pin
For example, if your HUID is 87654321, your login is 87654321@harvard.edu, and the password is the same one you use to login whenever you use that HUID online. (Note: I don’t know if this works for XID users, but imagine it might not)
Please don’t ask me how many permutations of my name, HUID, and email I tried, or how many times I almost punched my computer.
At this point, you should be configured, and you should get some confirmation that the certificates are installed and valid. Congratulations! You may on occasion need to reenter your account name and password to log into eduroam, but you shouldn’t need to reinstall the certificates (as far as I know).
And you should be free to surf the internet wherever you see the eduroam network, anywhere in the world!
For non-Harvard folks: the same principles apply for every eduroam setup. You need to install authentication certificates before the network will work, and those certificates are issued by your home institution. If, like Harvard, there’s no clear information online about where to get the install packages, contact your home IT department and request their help. Also, the login will almost certainly be different. Many institutions use the email login name; I suppose that Harvard’s multiple email domains (fas.harvard.edu, college.harvard.edu, seas.harvard.edu, etc.) prevented that possibility.
Anyway, I hope this helps you get connected! Have a happy internet!
The year of knitting from my head
This year I’ve decided to do the majority of my knitting from my own head, without using someone else’s published pattern as a starting point. A good friend heard me proclaim this, and thought I was crazy, what with a dissertation to write and an unfortunate dearth of free time in my life, so asked me to explain my reasoning. She raises some good points, but I still think the pros outweigh the cons. Allow me to explain to you all…
Back when I re-learned how to knit in 2003, I didn’t have access to a lot of knitting patterns. I had a couple of booklets from big-box stores, and a few basic patterns I’d bought from yarn stores. So, I knitted a lot of very basic things, and used my knowledge of garment construction (from sewing and crochet) and color relationships to improvise things. The result was, at first, some very basic, often wonky or rectangular things. Eventually I discovered Knitty and some good knitting blogs and pattern repositories, and my eyes were opened. I started cobbling together different parts of patterns to make new and interesting projects. I started charting out designs in cables or colorwork and branch out in the shapes and kinds of things I knitted. Some patterns I altered on purpose, some by happy accident, and some I stayed true to, down to the smallest detail. I invented a fair number of things from scratch, and had to scrap a fair number of them, like the mesh yoga mat bag that was better suited to holding a dozen soccer balls, or the cozy alpaca shawl with dyelot issues that blocked out larger than a bedspread. But some were wonderful, like the iPod holder for wearing under my coat, or my first fair-isle hat, or the satchel with an endless knot worked in cables (which was given away with nary a photo taken). It was this kind of fearless and inventive knitting that got me a job at Stitch House, and which got my heart pumping.


Then, in 2007, after months on a wait list (get offa my lawn!), I joined Ravelry. And it was awesome. But it also changed the way I knit. All of a sudden, patterns were not just something you could find on one webzine or in a shop. Patterns were fodder for conversation. People would recognize the patterns I knitted, and would complement me on them when they recognized them. I found that people at the yarn shop were more likely to swoon over a nice project that they recognized than one that they didn’t know. And, as a salesperson, it was in my best interest to knit things that customers could find online or in the store and buy yarn for. Saying, “Oh, I’m making it up as I go along” not only sounded strange, but it also didn’t sell any yarn. Soon, I was knitting almost exclusively from other people’s patterns, and preferring “hot” patterns over obscure ones. And it made me a little uneasy. One fantastic thing about other people’s patterns is that you learn how someone else would tackle a problem. And sometimes it’s fun to figure out what they’re doing, and make a judgement call: do I want to do it their way, or do I have a different idea I like better? But if the pattern is clearly-written and well-edited, and you don’t intend to do anything crazy like restructure the shaping or add in many new elements, often following a pattern requires very minimal mental acrobatics. And after a while, I started to miss those acrobatics.
So this year, I’m knitting from my head. I no longer have the pressure from working at a yarn shop, and, like the year in Russia that ignited the spark of my most creative early knitting, I’m knitting to keep sane and happy more than to show off my pretties to others. I’m not saying that I won’t knit anything from a pattern this year, because I’m happy to be carried away by something beautiful. There are a lot of gorgeous patterns in my queue, and I’ll be happy to work on some of them. But I’ve also got a lot of gorgeous ideas in my head. Knitting from my head means taking those ideas, and instead of going to Ravelry to find some close approximation that someone else figured out, it means going to my sketchbook and figuring out what my vision for the project actually is. It means swatching, and calculating, and trial and error. It means stash-down, it means cold-sheep, because I can tailor my projects to my yarn stash and not the other way around. And it means taking more control over my spare time, and using it to feel awesome about myself and the things I do. When I knit from my own head, I’m allowing my own interests to shine, and embracing the puzzles, the tricks, the difficulties. And the beauty in figuring out the solutions to those problems. And the pride of successfully having untangled the Gordian knot.
And, maybe I’ll make some lovely patterns to publish and share with all of you in the process!
New Growth
The winter is on its way out. Take heart, everyone, it really and truly is. Even if the thermometer doesn’t necessarily agree, the sun does.
Every day, my southwest-facing kitchen window gets a little brighter a little longer. This week I installed an extra shelf on the windowsill, to make more room in that sunny and warm spot for the houseplants that are thriving in their little oasis (this window also has a baseboard heater below it!), and for the seedlings that I hope will be taking root in their little egg-carton cups to make a fine balcony vegetable garden this summer. The first sprouts were spotted this morning!

Lettuce sprouts!
Some of you readers might remember a post in the summer, where the cockles of my heart were warmed by the eagerness of my houseplants to brave the transition to a new land and put down roots. Well, they just keep making me smile. My little cuttings have turned into real plants. The Christmas cactus is due for a repotting, as the cuttings are overtaking the pot. The baby rubber plant has turned over a new leaf, so to speak, and instead of monochromatic green leaves, now sports beautiful, glossy light and dark leaves. My jade is more circumspect, and is taking its time to grow, but even so is doing well. A retrospective in photos:
The plants I gave up in Cambridge:


The transplants, after a month in Montreal:


Today, 8 months in:


And what’s more, I planted some grocery-store sprigs of mint in the summer, and they’ve turned into a sprawling bush of mint. I chopped off some sprigs to try to tame the growth, stuck them in water, and within a couple of days have set out roots with abandon:

Things are growing!
Whimsy
With the days getting ever so slightly longer, I’ve been feeling phenomenal lately. My academic writing’s been going well, and I’ve been baking up a storm (nothing adventurous, but my family never says no to a batch of tried-and-true cookies). I’ve bought seeds to grow a garden! Just when it couldn’t get much better, I had a brilliant idea that would make my life oodles better: redesigning my winter hat.
You see, my warm winter hat was a gift a few years ago – a white wool “Kaldi” hat from 66˚North, with fuzzy lining and earflaps. It’s a lovely hat, but has a few problems. It’s always been a little snug on top, and the peak of the crown is sort of pointy, making an egghead shape. And, the seams are on the outside. Maybe it’s “traditional”, and it was a look that was super trendy some years ago, but I never liked outside seams (and don’t get me started on inside-out fair-isle).

66N Kaldi Arctic Hat
So the other night I took my stitch ripper and performed some fuzzy-hat surgery. I undid all the seams on top and restitched them by hand with a narrower seam allowance, making the hat roomier and bringing the seams to the inside and out of sight. I also changed the crown shaping a bit to fit my head and eliminate the peak. I changed the way the front flap folded up a bit, making it rounder and smaller. And I took off the designer label, just because.

Hat with new seams
And then, I got an idea. I’ve been thinking for some time of decorating the hat, because a large white hat is nice, but couldn’t it be nicer? Embroidery? A dye job? Knitting a cover for the whole thing? As I was staring in the mirror, it came to me. Cat ears. CAT EARS! I grabbed my yarn and knitting needles and set to work.
These ears are the same as the ears of Hibou the Owl, just bigger and felted. I cast on 60 sts, and worked 3 double-decreases evenly spaced every other round until all stitches were used. Then I felted by hand a bit, but eventually just tossed them into the washer and dryer with my other laundry. A little shaping, a little stitching, and then, voilà, ears!


Ready for the cold!
Socks on the go
So, I like knitting socks an awful lot. But my knitting time is not so copious these days, so I make sure to always have a project with me on the go so I can make use of those precious oft-wasted minutes waiting in lines, sitting on buses, or just waiting for my gosh-darn computer to finish loading whatever it is that’s taking so long. I find that knitting is especially useful in helping me avoid the black hole of internet distraction while writing my thesis. If I need a break to decompress or gather my thoughts, I knit a few stitches and let my brain settle, rather than checking Facebook or Ravelry and suddenly finding that a half an hour has mysteriously slipped out of my grasp.
And, as I’ve mentioned before, I really like knitting socks on double-pointed needles (DPNs). But traveling with DPNs can be tricky. Knitters worry about the needles slipping out of the work, or getting crunched by the other things in your bag, and for good reason! I’m fearless (and really good at picking up lost stitches), so this doesn’t stop me, but I can see why others are less eager to throw a sock with its 5 toothpick-needles into a backpack and pull it out on the bus.
So what’s the solution? This is my roundup of options for keeping your socks safe between bouts of knitting in public, including my own prototype DPN sock holder (DIY all the way, baby).
First, the solutions you don’t need to buy:
Wrapping your needles up in the yarn. This has long been my preferred method of transportation. You fold your sock up, squish the knitting to the middle, and wrap one end with the working yarn. Then, you wrap the other end. Then, you do a little figure 8 back and forth, and secure by catching the working yarn between the needles on one end. Voila, you’re good enough to go.
Rubber bands. This is too much effort for not enough class for me, but you can put rubber bands of any size (actually, I recommend fabric-covered hair elastics, so they don’t snag your yarn) on the ends of your needles, bundling them all together. Be careful not to make them too tight on small needles, though, or you could warp or even snap the needles.
Solutions from your LYS, or online:

Clover needle holders. These little plastic coils work like the rubber bands, except they’re cuter, and will set you back $5-7 a package. They come in two sizes, and the size you choose will depend on how big your needles are and how many you’re bundling together. I actually think the flexibility of the rubber band wins in this case.

Rock Your Socks by NeuroticNeedles on Etsy
Rock Your Socks holders. This is available on Etsy from seller NeuroticNeedles, and I’ve seen similar (or the same) in a yarn shop locally. They’re two plastic caps that fit over your needle tips, with an elastic that connects them and holds them together. Sometimes they have cute little charms in the middle. It’s a nice concept, and will stop dropped stitches or missing needles and accidentally poking through your bag, but if you shove your laptop on top of your sock, this isn’t going to offer any protection. But, a good concept, worth trying out. $6-8 on Etsy, depending on how fancy the charms are.

Knitpicks Sock Knitting Needle Holders. I’ve personally used these, and liked them. They are a pair of paperboard tubes that sit snugly inside one another, with a slit that allows your sock knitting to come out the middle. You can store empty needles in them too, by just rotating the tubes so that the slit is closed. The way they’re designed means they fit a wide range of needle lengths, and you don’t have to worry about elastics snapping. But, the quality is chintsy. They’re paper, after all. After using them a short time, the layers started to come apart. I taped them back up, but then my toddler found them, and that was the end of that. Advantages are the price ($5 for two sets of tubes). I’ve only seen these on Knitpicks.com, and I’m still boycotting Knitpicks because of their unprofessional security and customer service practices. But they’re an affordable product and do the trick for light use.
Tin holder – discontinued? Way back in 2006, the Yarn Harlot blogged about a tin needle holder that she’d gotten, that originated from Woolworks, Ltd. I’ve contacted them, and received no reply, nor does their website mention awesome needle holders, so I have to assume that they’re no longer being produced. Too bad, because they looked great.
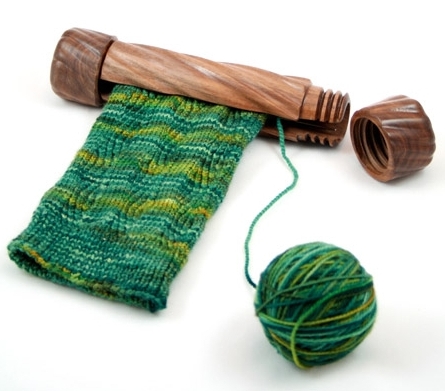
OMG gorgeous – http://www.knitzi.com
Knitzi. This is the gold standard of sock knitting needle holders, and I want one so badly. They’re hand-carved wooden tubular cases to do essentially the same thing as the Knitpicks case, except gloriously. Instead of two nested tubes, there is one tube with a threaded cap. Because of this, they come in a few different sizes. Unfortunately for me, this makes my life trickier, because I have a few different lengths of needles. I’d rather get the smaller, 5″ one, to keep weight and bulk down, but I sometimes knit with 6″ needles. Dilemma. It’s okay, the beautiful “Flow” case in walnut above is $109. Regular Knitzis come in sizes ranging from 4″-8″, are in the $30-40 range, and are custom made, so they have a greater turnaround time, but only a couple of weeks. Not exactly instant gratification, but we’re knitters, we’re not in this for instant gratification. Covet, big time.
So, my own prototype looks like an absolute monstrosity following that thing of beauty, but I’m still pretty proud of it. Meet my 50-cent sock DPN holder:
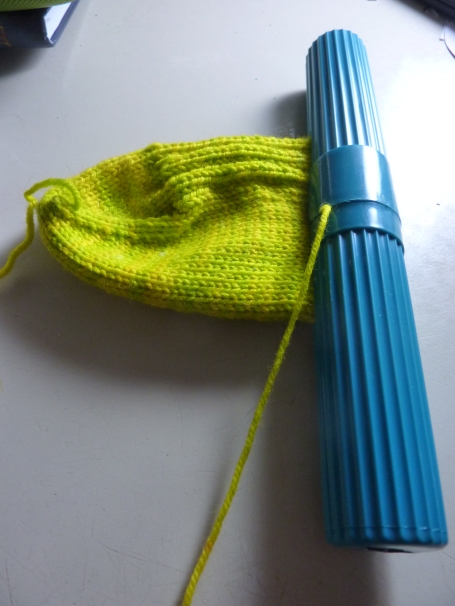
Yes, that’s a toothbrush case. I got it from the dollar store, 2/$1.
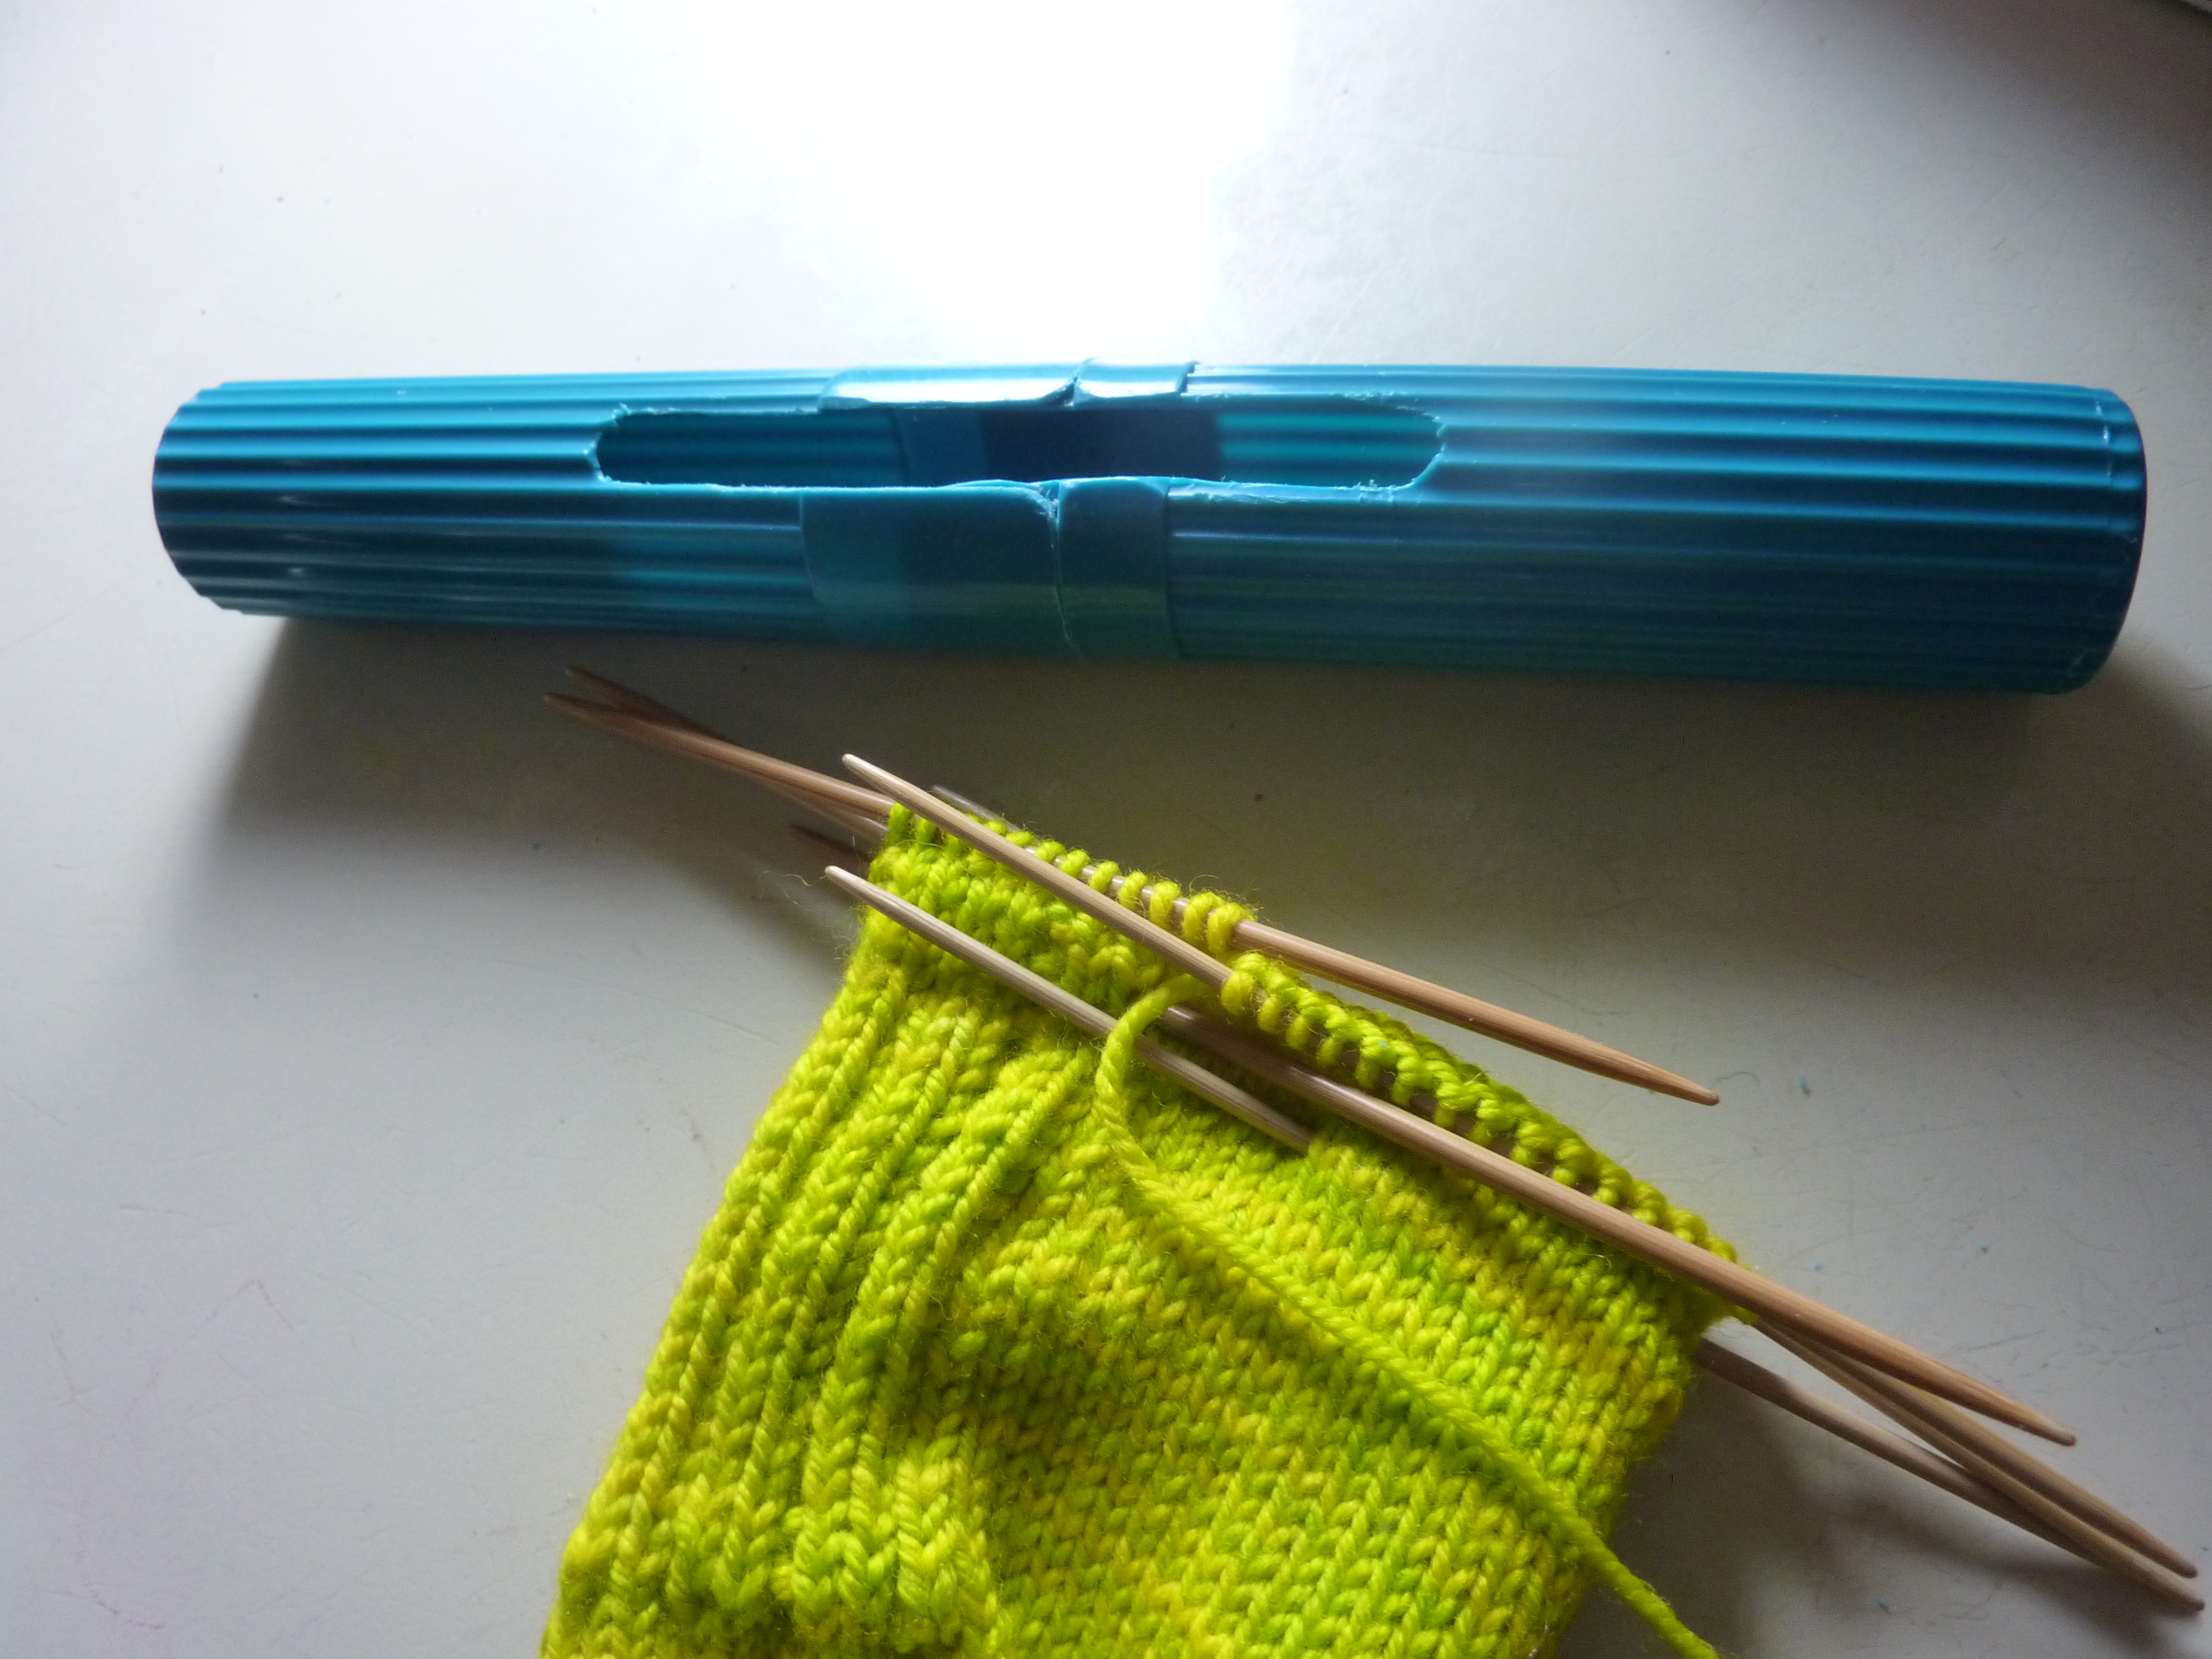
And I cut openings in each half, and smoothed out the edges with an X-acto knife.

And then I threaded fabric-coated elastic through the drainage holes and tied it together at tension, so the two halves would stay connected and have enough pull to keep closed in my bag.
And you know what? It’s great. I’m thinking of some modifications, to drop some hot glue in those holes to prevent extra needles from slipping out, and maybe finding a slightly better elastic. But it’s perfect. The hardest part was finding the toothbrush case, because CVS didn’t have this kind, just the over-the-head type.
Anyone else have stories of successful sock knitting hacks?
Best Friends
New Year, new post! Life has been busy, with dissertating and living and all that, but I wanted to show you all what I’ve been working on most recently in the knitting world. Meet Hibou and Étoile, the very best of friends:

Ravelry Project pages: Hibou and Étoile
The inspiration for this charming duo comes from an absolutely adorable YouTube video I stumbled across, of Twinkle Twinkle Little Star. In it, a cheery owl decides to take an adventure up into the sky, to see what that star is really all about. The star and owl exchange friendly glances, and holding hands, go off on a playful frolic through the clouds. Eventually, realizing that they belong to two different worlds, the star and owl regretfully part, but the implication is that their friendship endures. Or something like that.
What is undeniable is how cute it is. And how absolutely intoxicating it is for my toddler, who would watch it 15 times in a row if you let him. So, for the holidays, I decided I’d make a pair of stuffed animals so that he could have his own starry adventures. I’m incredibly proud of how these came out (especially the owl) and I hope that sometime I get around to writing up a detailed pattern, so that others can have adorable owls too. For now, though, I’m happy to share the basics of construction, which can possible help inspire you to try something similar yourself! A lot of people think that stuffed animals are a lot of sewing up…but these are practically seamless. A little fiddly, yes, but almost no sewing involved.
I started off with the star, because it was the most straightforward in my mind. I’ve made knitted stars before, although my last star was started along the outside, with decreases forming sharp lines along the radii, which was something I wanted to avoid in this star.

For Étoile, I started in the center and worked outward, with lifted increases, to try to minimize the overall visual appearance of the increases. I also decided to have the increases fall along the “armpits” of the star, and then work the peaks separately afterward. So, I cast on 5, joined in the round, and increased in 5 places every single round, alternating left- and right-leaning lifted increases.
When the body of the star seemed big enough, I put it on a holder, and then did the same thing again, so I had two pentagons. Then the fun part. Lining up front and back, with the purl sides together, I worked in the round over 1/5 of the star’s front and 1/5 of the star’s back (from “armpit” to “armpit”). Here, I did double decreases at both sides every other round, to make a “seam” look that would actually be seamless. I did the same thing for each of the points, picking up stitches at the corners to avoid gaps (like you would for glove fingers), until there was just 1 point left.

At this point, I wove in the ends that I could, and stuffed the whole thing. Once stuffed, I decided on the placement of facial features, and used a pair of black glossy safety eyes, backed with a small circle of white felt, to make eyes. The mouth and eyebrows were done with black embroidery floss, and not being an embroiderer, I probably didn’t do this the most efficient or effective way. But, to make the large filled areas for both mouth and eyebrows, first I stitched the outline of the shape I wanted to fill, using 2 plies of floss (I don’t have any pictures of this process, as it was done in hiding and in a rush in the nights before Christmas!). I did the outline in split stitch, and fairly small stitches, to be as secure as I could on the loose knitted fabric. Then, I sort of made up a fill stitch – it’s like satin stitch, except that it’s not flat and it doesn’t totally encircle the fabric it’s worked on – it makes figure-8s between the two rows of split stitches, only on the surface of the knitting. I don’t know what it’s called – do you?
Anyhow, I filled in these shapes, then went to work setting in the eyes, so they’d look more naturalistic and less bug-eyed. To do this, I used 2 plies of the yellow yarn (Cascade 220 SW) and a long soft-sculpture needle, and essentially just sewed the fabric just around/behind the eyes to the stuffing beneath it. I secured off as best I could, finished knitting the last point, stuffed the last bit before finishing, and secured off the final end, tucking it back inside the stuffing to finish.

The owl was trickier. I started with the legs, and made two crown-down “hats”, each with 5 increases every other round. When they were big enough, I joined them together in the round, and worked some short rows to fill in the gaps in the front and back. Pretty quickly, I realized that the owl was a lot fatter than I’d planned him to be, so instead of having his wings come straight out from his body, I decided to do “raglan wings” and have the body gradually taper up to the neck. I had to do some tinkering with this, but it paid off. The front and back were worked flat, and then rejoined in the round for the neck. I did some quick decreases followed by some quick increases to make the neck shaping, and then increased in 8 places every other round to make the bottom of the head, worked even a bit, and then decreased in 8 places every other round to make the top of the head. I finished the crown of the head just like a hat, pulling through the small number of remaining stitches.

For the wings, I picked up stitches around the armholes, and worked even about an inch. Then, I did a centered double decrease at the bottom point every other round for a few inches, and then every round until I ran out of stitches. After finishing one wing, I stuffed him and worked on the face features.
The mask was originally going to be made with commercial felt, but I wasn’t happy with the result, so I knitted an 8-shape out of feltable wool (Knitpicks Bare Worsted), and felted it by hand in my kitchen sink. Doing it this way meant I could stop felting as soon as it was the right shape/size, and then I could wet-block it to shape over a ball overnight so it would lie nicely on the face. I sewed it on with a whipstitch.
The beak was made in two triangles, one slightly larger than the other, sewn together, then stuffed with a tiny bit of polyfill and sewn on over the mask.
The ears are little pyramids, with doubled decreases in 3 places every other round, and sewn onto the head using mattress stitch with a little polyfill stuffing inside. To make the eyebrows, I did a bit of applied crochet – single crochet, double crochet, and triple crochet, filling in the space from the eyes to the tips of the ears.
Eyes were the same safety eyes and white felt as the star’s eyes. I set both eyes into the head the same way as I did for the star, using a length of white yarn.
I knitted the other wing, then did a bit of embroidery on the wings using the knitting yarn, quilting some of the stuffing into wingfeathers, and pinching the wing edge so that it puckers like feathers.
Feet are just little lengths of I-cord, sewn on with the leftover ends from the beginnings of the legs.

Hibou!
I hope I have time someday to write this all up in more detail, with elaborations and numbers, but until that day (should it ever come), I hope someone gets inspired to be adventurous and make something adorable!


